If you haven’t planted your garlic yet, don’t despair! There is still time to put it in the ground. In fact, right now is perfect.
Some say the rule of thumb is to plant 4-6 weeks before the ground freezes. Others say plant any time from late September through mid-January, as long as the ground isn’t frozen. Philosophical Europeans go for the Winter Equinox. Others say avoid the winter and wait ’til spring.
What to do?
Well, that depends. Here in Sequim, WA, our winters tend to be relatively mild. We are officially in USDA Zone 8, which, amazingly enough, puts us in the same backyard as Tifton, GA, Gainesville, FL, and Dallas and Austin, TX. I seriously have no idea what their growing season is like.
Here’s the deal: the garlic needs a period of cold to be able to form a bulb. My rule of thumb is to plant around Halloween. That’s an easy one to remember. Many years, I have still been planting in early November. I would think any time after the first frost would be fine. This year, based on some advice from good friends in Pennsylvania (thank you John & Sara!), who have been growing garlic for many years on a much grander scale than I can even comprehend doing by myself, I planted almost a full month earlier (early October, but still after the first frost). I am anticipating the biggest bulbs ever as a result (and also because of wider spacing).
 There are pros and cons to planting early or late. Early, the garlic gets a head start on the growth, resulting in larger bulbs at harvest; however, those tender shoots are much more susceptible to winter damage. Late, the bulb doesn’t have much chance to grow roots and stems until spring, resulting in smaller bulbs at harvest. According to Ron Engeland, who many of us hold high as the Guru of Great Garlic (see his book, “Growing Great Garlic. The Definitive Guide for Organic Gardeners and Small Farmers“), bulbs planted later, although smaller, produce fewer cloves per bulb. Those cloves tend to be more plump, dense, and heavy (indicating high soluble solids), and have better storage capabilities. Early plantings (meaning, September) tend to be larger, have more cloves per bulb, and produce more double bulbs. Cloves tend to be skinnier. Also according to Growing Great Garlic, storage temperatures and humidity prior to planting can have an affect on subsequent size and whether doubles are produced or not. Engeland has it down to a science, and I learn something new every time I refer to his book.
Personally, my main objective when it comes to planting is to get them in the ground before it starts raining. I have been known to be out there planting during a cold downpour, but it’s not my idea of a great time. November is the beginning of our rainy season, and today is a strong example. The ground is completely saturated. There is a 25-ft swell coming in off the coast, and most of the garden is instinctively hunkering down. I am thankful the garlic is safe and snug in their beds.
 How, exactly, do you plant garlic? I get that question all the time. I have been growing garlic for over 30 years, which makes me sound a little crusty, so you’d think I’d be an expert by now. I have to say, though, every year is a horticultural experiment. It’s like following one of my recipes. There are guidelines, but when it comes down to it, every back yard, acre, or whatever you have to work with is a little different.
The key is that you have to think like a garlic.
Garlic is hardy (remember, it grows in Siberia!), but it still has basic needs. Harsh conditions will stunt its growth and make it less resistant to insects and disease. If you want superior growth, you need to encourage it to be strong. I’m all about encouragement.
Crash Course:
1. Prepare the soil.
2. Separate bulbs into cloves. Plant cloves 6″ apart, 2″ below the surface, pointed end up.
3. Cover up and wait.
How hard can it be?
Ok – now for the detailed version:
 1. Do the math. Ahm. It’s already getting complicated. I can’t say I always do this effectively, but if you’re going to plant a lot, and particularly if you’re planting several varieties (we grow 23), figuring out how many you can plant in the space you have is an important first step (I think it’s called “planning”). However, if you are going to stick a bulb in here and there or you just have a small space and are not too worried about it, you can happily skip right past this step.
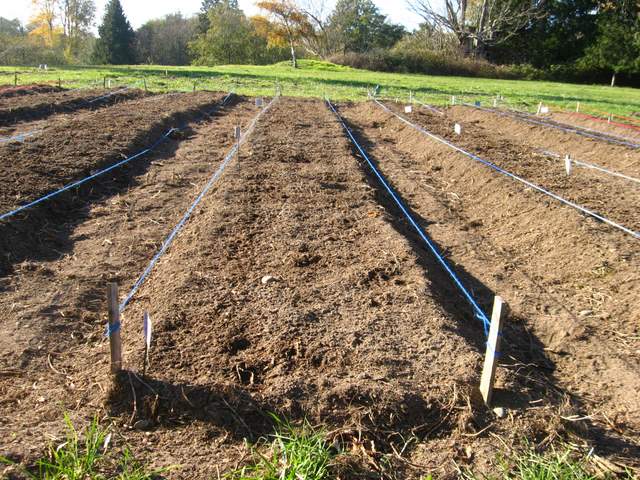
Personally, at garlic-planting time, I become a pseudo-architect and stake out beds with sticks and old yarn. I calculate the length and width of the plot, the beds, and the paths in between. I graph it in Excel (I kid you not!). I make adjustments so everything fits evenly into the allotted space. I plant my bulbs 6″ apart, and in the past, I have staggered the rows to be able to fit in more bulbs. Last year, I planted seven 2-foot-wide beds with 4 rows of garlic in each bed. In my opinion, this schematic was just a bit too tight. I got a fine crop, but I think a bit wider spacing and wider beds would have been better.
This year, I built four 3 1/2-foot beds with 4 rows down the beds, not staggered (to facilitate weeding) and a little wider spacing on the theory that they will be better able to reach for nutrients and to handle the variations in weather. As a result, I am also planting about half as many as I did last year.
Scaling back was a big decision for me and a big part of this whole “planning process” thing. I experienced something I would call “garlic creep.” That is where you decide, “Aaghhh! I can’t do this anymore! 1300 bulbs about killed me! From now on, just for family. Seventy-five bulbs, max.”
And then a few friends contact you and say, “What? I think you are just coming into your prime! Why quit now? Look at all the contacts you are making! There are not enough reasonable, competent, quality garlic seed stock suppliers out there. There is a market for quality growers who are not out to get rich quick…”
Or – “What? How can you possibly quit after all these years? Your garlic is so good! Where will we get our garlic?”
(Read that, “fix.” I am starting to feel like a dealer). And so I say, “Ok …Ok … family and a few friends…200, max; maybe 250.”
Then you have an incredible year selling the garlic. People just can’t seem to get enough of it. All that marketing is starting to pay off and a general awareness of the superlative qualities, both gastronomic and healthwise, is starting to be appreciated. Once you have homegrown, the other stuff is – well – just so inferior.
You think, “Hmmm … maybe a few extra for sale wouldn’t hurt.”
So you revise the planning thing (in Excel, a simple change of formulas) to calculate 6 different options, including specializing in just a few varieties that grow best, more varieties but fewer of each kind, a bunch of a few and a few of a bunch…close spacing, wider spacing, narrow beds, wide beds …. Ok, maybe not so simple, but you get the idea.
In the end, you go out there, armed with buckets of garlic, and see what fits. You’ve done the math. But then, lo and behold, the beds are actually a little longer than you originally measured, so you have more room, but it’s ok, you have extra, and you don’t really like spreadsheets anyway.
Ok – maybe this isn’t you. Maybe this is just me. Planning is a tool. If it doesn’t work for you, just do it. Which brings us to our next step:
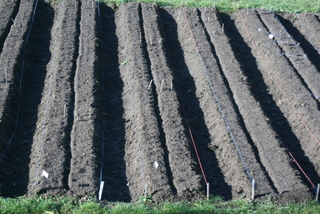 2. Prepare the planting area. To me, it’s all about the soil. The better the soil, the better the plant. With garlic, it’s just common sense: the looser the soil, the easier it is for the bulb to expand. Sandy loam with lots of organic matter is the rule of thumb for just about everything. For me, it’s something I reach for. We have a clay streak that is a challenge to work around. My solution is to grow green manure crops and turn them under, add compost and other organic amenities, and build beds. I can’t claim to be very good at making my own compost (I don’t get around to turning the massive piles I make, I don’t apply enough water, and they don’t heat up enough to kill the morning glory and grass seed). This year, I bought some from a neighbor who does it right with a bulldozer (Thank you Steve, at the Lazy J Tree Farm! Good stuff!). Beds keep the soil fluffy, provide good drainage, and allow the soil to heat up a little more; spring heat is always in short supply here.
My beds are simple: I shovel from around the perimeter & heap in the middle. No fancy sidewalls, which aren’t very practical because I rotate my crops around 6 plots, planting cover crops in alternate years of veggies and garlic. Rotation is important in preventing fungus and disease problems.
I mix a bit of lime and bonemeal into the beds while I build them. Sometimes I throw in a few more nutrient-building amenities, such as kelp, alfalfa meal, cottonseed meal … but you can overdo it with this stuff. Balance is key, and you can’t go wrong with good ol’ compost. I rake the beds smooth and dig a small trench down the center so the water has a place to sink in without running off the sides.
And now to the nitty gritty.
 3. Planting: Break apart the bulbs into individual cloves and stick them in the ground, pointed end up, scab end down, with about 2″ of soil covering the tips. Planted more deeply offers a little more protection for the bulb; however, if your soil is not very loose, the bulb will have a harder time expanding to its full potential. A shallower planting, on the other hand, makes the bulbs more susceptible to freezes, thaws, and ground upheavals.
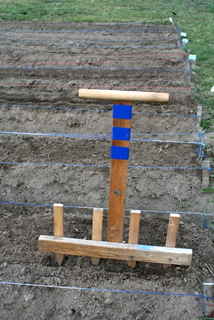
Check out the handy bulb planter we made: very simply, a cross bar with some stakes screwed into it. I can step on the cross bar and quickly create 4 holes at the right depth, evenly spaced across the bed. Then I just go back over the bed, plant the cloves, cover them up, and pat the soil down to eliminate air pockets. Big cloves mean big bulbs – so plant the big ones and eat the rest.
But wait! Don’t eat them all yet! If you have a little extra room, cram a bunch of the smaller cloves into the space, close together. You can harvest these early in the spring as garlic “scallions,” a whole lot like green onions, only garlicky. People scarf them up and will love you.
And here is a little pre-plant secret: I give my cloves a little boost by first soaking them in a solution of 2 capfuls of liquid seaweed fertilizer, 1 T baking soda (neutralizes fungi), and 1 T molasses to 1 gallon water. I soak them for a few hours to overnight. Then, just before planting, I dunk them in rubbing alcohol for maybe a minute at most – just enough to kill any bacteria. I’ve had some old-timers laugh at me for this, saying for all this trouble, I am just attracting insects and inviting molds. I will admit that my garlic was good before I started this practice, but each year there are a lot of variables that affect growth, size, and storage capabilities. I might have to do some experimenting in the future with some control plots, but for now, I’m still a believer in this secret formula. Ok, maybe not so secret. I found it on the Internet. Gourmet Garlic Gardens, to be exact. [2013 update: Since this was published, it seems everyone is doing this whole soaking thing, which is how things take off as gospel in cyberspace. I have to say, even though this guy obviously knows his garlic (and I am a huge fan of Garlicmeister Bob Anderson), you have to keep in mind, he’s in central Texas. I have been following his advice for a few years now, but I still have to wonder whether all that soaking and dipping is necessary in our Pacific Northwest wet, winter soils, or whether it is better to just build good soil and select disease-free cloves from the get-go. I am still experimenting. So far, there are so many confounding factors from one year to the next, it’s honestly hard to tell. Seems like a lot of people swear by his methods, though, and they seem to make sense.]
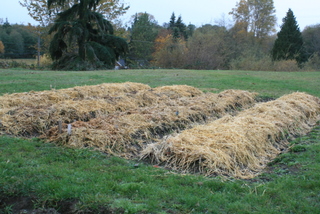 4. Tuck them in for the winter. Mulch: I have a love/hate relationship with mulch. It’s a balancing act in the Pacific Northwest between something that keeps too much moisture in, which encourages rot and gives a nice home for slugs, earwigs, and voles – and something that helps mediate extremes in temperature, moisture, and the drying effects of the wind that rips through here most all year long. We can save the mulch discussion for another post, because I can go on about it extensively, and this entry is already pretty extensive. This year, I had access to some pretty good straw with a minimum of grass seed (thank you, Gene Adolphsen and Adolphsen Farm!), so I put a fairly heavy layer of fluffed up mulch over my beds just before we got hammered with a series of heavy rains (with more in the forecast). The mulch saved the beds from totally flooding out and turning into muck (remember my already soaked cloves attracting molds and insects?). In the time it has taken me to write this article, the thunderclouds have passed. I look outside now and the sun is shining, the sky a pale blue with scattered clouds, true to our reputation of being the “Blue Hole” in the rainshadow of the Olympic Mountains, now freshly dusted with their first snows. The mulch is out there, having done its job of filtering the rain and providing extra drainage, and now preventing the sun from drying things out and warming up the beds. Mulch is such a mixed blessing. This year, though, we’re going with it, and I will give status reports as the season continues. [Status report: The mulch was TOO heavy and I did not pull it back soon enough in the spring. My garlic crop was a near total failure this year because of molds, slugs, voles, and everything that loved that warm, damp environment. If you use this kind of mulch, be sure to pull it out of the way in March, early April at the very latest! It not only holds in the moisture, but also prevents the soil from warming up. And – to make matters worse – the weeds really seemed to love it!]
5. Ok. Garlic is in. What a relief. Kick back and enjoy the holidays. Aaaaaahhh.
Want to grow Elephant Garlic.
Check out http://www.ElephantGarlicWorld.com
Quality seed stock grown in Oregon since 1999.
Non GMO and Pesticide Free plus no synthetic fertilizer is used.
Free how to grow info and lots of pictures on there web site.
Thanks, Ken! I no longer sell garlic, so it is good to know about regional sources. I see you are located in Oregon. Are you anywhere near where they have the Elephant Garlic Festival in August?
Can you plant in March and April in Colorado
Sorry for the delay in getting back to you, Dan. To be honest, I don’t know much about growing things in CO, but lately I have been reading about how garlic used to always be planted in the spring, not the fall. Fall plantings get a bit of a head start in getting their roots established, but when I have leftover garlic that is starting to sprout in the spring, I often go ahead and stick it in the ground. It WANTS to grow, right? Maybe it won’t get as big as fall-planted garlic, but you will still get *something*. Garlic needs a period of cold to form cloves. I would think it could still get that in March in the highlands of Colorado. I say give it a shot and get back to me on how it does! Thanks!