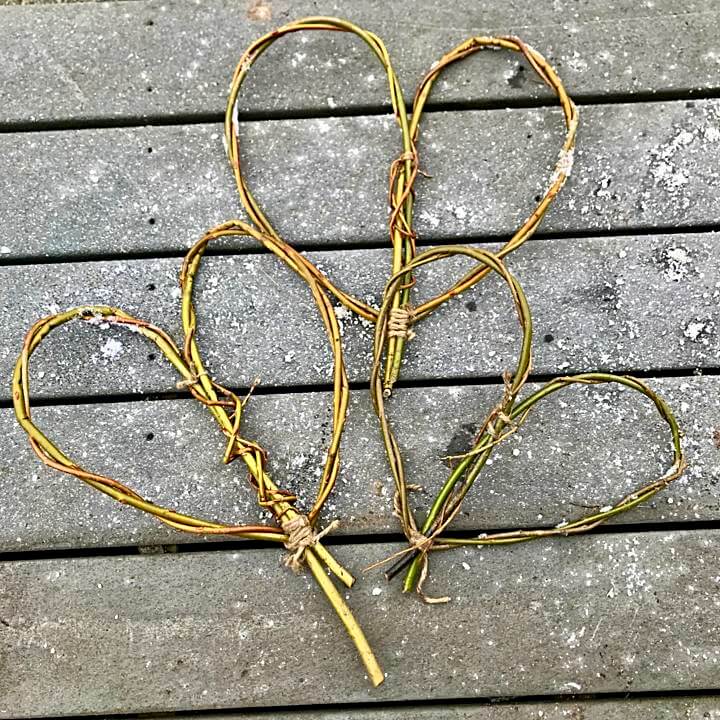
Wreaths aren’t just for Christmas! Here is a simple project that makes a a perfect gift for Valentine’s Day: a heart-shaped willow herb wreath. Quick. Easy. Heartfelt.
The trick is to not overthink the process too much but just go for it. Set perfectionist tendencies aside and embrace the organic rustic look. Add extra stems for a thicker wreath – or not. Add herbs and other greenery – or not. It’s all good.
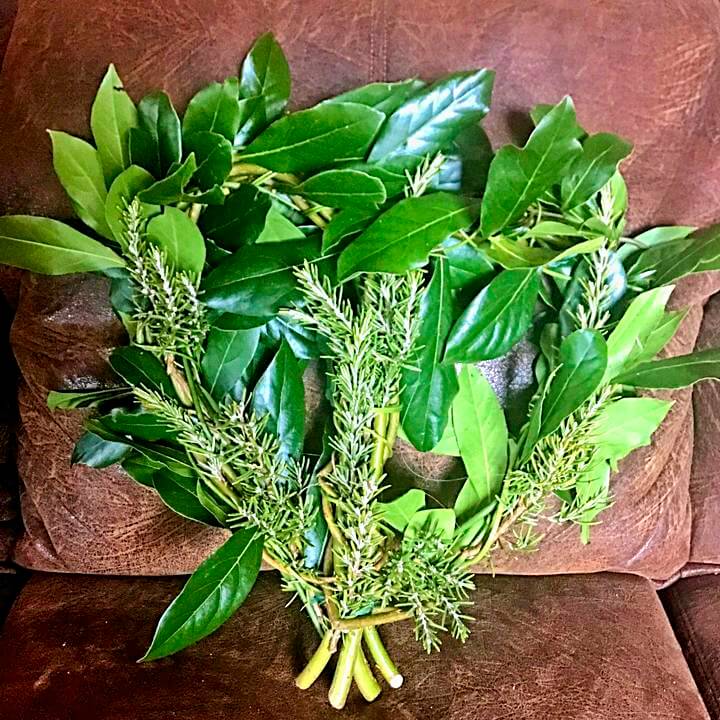
For this wreath, I used willow stems, bay leaves and rosemary, but whatever you can find will do. We just got hit with several inches of snow – so I had to tromp around a bit. Doug fir and rose hips would still be accessible, as would some sage and thyme. Our Star Magnolia has catkins like pussy willows, which would be a beautiful addition. Or just leave it plain. That’s ok, too.
We are in the middle of coppicing our willows, so we have plenty of stems of all sizes (if you live in our area, I am willing to share!). We are growing several varieties of basketry-type willows, but you could use other plants as well – weeping willows, pussy willows, dogwood, apple prunings, alder, whatever you can find that has a bit of flexibility to it.
There are a lot of ways to make a heart. For this one, I held the stems perpendicular at the butt ends and bent the tips over and around to each side, tying them all together at the bottom and then weaving them back up the opposite sides. Here is the general procedure:
- Select an even number of willow stems (In this case, I used 4. I also did some with just 2. Much more than 8, though, and it gets to be a bit too unwieldy. If you want a thicker base, you can always add more stems for bulk later [see step 6]).
- Work the willow a bit before shaping. Because this is green willow (rather than dried and soaked), it has a tendency to kink. If you gently flex it all along the stem first, it gets used to the idea of curving. To start: take the branch in each hand and gently bend it into an arc. Then methodically work your way down the stem from one end to the other, gently flexing and bending it as you go. You want to curve it without kinking it – which can still happen – in which case, just work it on either side of the kink to make it less abrupt. Do this a couple of times. I sometimes bend it across my thigh or around my knee. I sometimes go inch by inch along the stem. Work with it gently. Don’t force it. Let the willow tell you which way it wants to bend.
- Next, take your bundle of branches and tie them together with a piece of twine at the thick butt end of the stems. Use a piece of twine a bit longer than what you need so you can tie the tips to it in a later step.
- Next, tie another piece of twine around the stems a few inches up from the one at the bottom, depending on how high up you want the heart to be. I went up about 6 inches.
- Now – gently bend an equal number of branches to each side to form the heart shape. Make them form an X across the bundle of stems at the bottom. I put the X across the back, but it could go either way. Tie them all together with the end of the twine. Leave the ends sticking out for now. Pull on the tips to adjust the sizes of each side of the heart, whether you’d like them larger or smaller.
- Cut off or tie in the ends: You could clip the tip ends of the branches right here or just leave them as is and call it good. I chose to continue up the other side, wrapping around the outer edge as I went. Start your wrap by bending the stem upward at the bottom to form a V (otherwise, it will make the heart look too rounded at the bottom). Continue wrapping until you run out of stem and then tuck the tips in between the branches to secure them. On mine, the stems were long enough to go up to the top and then down the center. Do this with each branch (two on each side in my case). At this point, you could add in additional stems for extra thickness, inserting them wherever you find a spot, wrapping them on up and around or even criss-crossing across the middle. Whatever you like. No rules here. I kept mine simple.
- Optional: Add extra greenery. You could add anything here, depending on what you have available. As mentioned above, we had just gotten a rare blanket of snow, so my resources were a bit limited, but I was still able to find some bay branches (Laurus nobilis) and some rosemary. I simply tucked the bay branches in near the bottom and tried wrapping them around toward the top. They didn’t want to stay very well. At this point, it looked pretty much like a bushy mess and I was wondering how to salvage this thing. hmmmm….
- Tie down the greenery: In the past, I have made wreaths by making little bundles of materials and pinning, glueing, or tying them onto the base. It can turn into a project. I wanted something quick and easy. I didn’t want to tie everything down with more twine, which would be too obvious, or wire, which would leave a spiral of wire when everything else had fallen apart. Instead, I used Periwinkle vines (Vinca major). Another type of vine might work just as well, but Periwinkle is easy to find here. In fact, they are taking over the steep hillside next to the road and are doing a good job of holding things in place. This plant quickly forms a dense ground cover and can be a bit invasive, so I have always had mixed feelings about it, even though it is known to have medicinal qualities. Well, I am now a fan. I cut a few of the long vines from under the snow, stripped off the leaves, and voila – the perfect twine for wrapping the bay leaves in place. Just move aside the leaves as necessary. Tuck in the ends to secure.
- Final touch: add a few sprigs of rosemary to cover up the original twine. I love the smell of rosemary and when the wreath starts to fade, they will still be useful. You could add a bow or some raffia or something. I didn’t go for frills.


So hey – that was kind of a fun little project. I quickly made 3 more hearts, only even more simple, using just 2 willow stems and leaving them plain. This is a great project to do with kids. One could make a good fairy or sorcerer wand by shaping the heart (or other shape) at the end of a long handle. Hmmm. Two hearts placed end-to-end might make some butterfly wings. I think we are on to something here….
Keep in mind, because it is “green” willow, it will shrink as it dries, leaving some gaps in the weaving. That’s ok. It’s not meant to last forever, although I have some that have made it for several years. One could stick more stems of fresh herbs in the holes. Eventually, it can return to the earth, as so shall we all.
Hearts are a wonderful symbol. They aren’t just for Valentine’s Day. Any day is a good day to share love and kindness. A heart wreath is just the thing.