I’m really excited about growing more dye plants this year – both expanding on what I already have and trying new varieties of some old favorites. But I have two problems: 1) narrowing down what to grow (always a problem) and 2) figuring out where to grow it exactly (um, yes, also a problem…). I figured if I used a garden planner to map it all out, I could get a better handle on what I have and where to put the newcomers.
I like the idea of mapping it out electronically so I can save the file and modify it later – but – I don’t want to invest in anything requiring a huge learning curve – or that requires a yearly subscription or all is lost. Some planners can get expensive fast. If you’re a pro, you pass that cost on. I am not.
There is a certain appeal, though, with dragging and dropping the veggies you want to the grid and – Presto! – it’s all laid out for you, square-foot gardening style – including recommendations for succession planting. No weeds.
The landscaping planners, on the other hand, go more for aesthetics. Don’t like the way your pavers look? How about red brick? A 3-D fountain might be nice…everyone likes water features. You can choose and customize dozens of templates. You get literally thousands of icons for plants, sprinklers, amenities, and textures. Some are like video games, with a realistic unrealistic perfect person wandering around smelling the roses. Kinda creepy.
That would never happen in My garden. Just sayin.
Test-Driving a Planner: iScape
I’m trying to stay open-minded here. So I downloaded iScape – which meant I had to create an account and not allow them to track my whereabouts. “The No. 1 app for designing your outdoor living areas. Whether you’re a do-it-yourself (DIY) Homeowner or an industry Pro, iScape has you covered.” Okey dokey then.
The free version was highly recommended – or not, depending on what you read. The internet is so useless sometimes. Turns out, not much is available unless you go with the Pro version: first month for $10, then $30/month. Yikes.
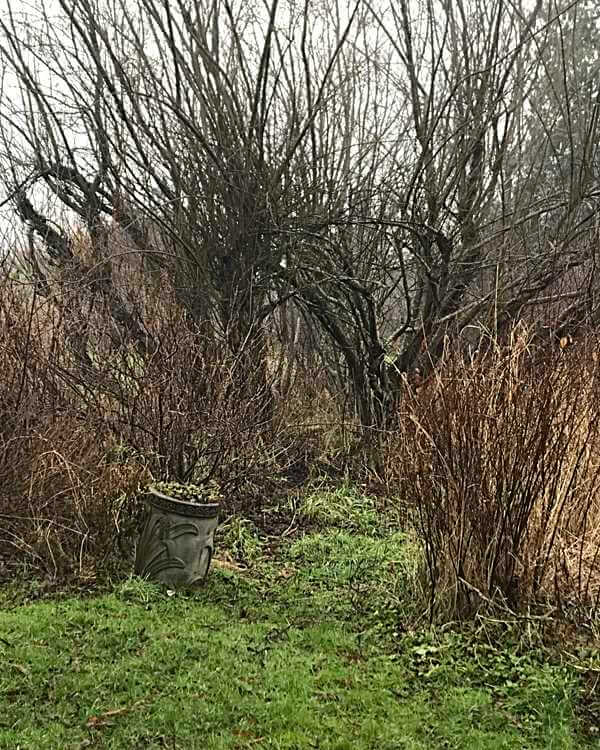
I uploaded a recent picture of the entryway to the willow room. The snow had just melted. Everything looks pretty beat up. It could use some sprucing up.
Pull it into iScape and it looks like I’m looking through a screen door! Complete with bugs on it!
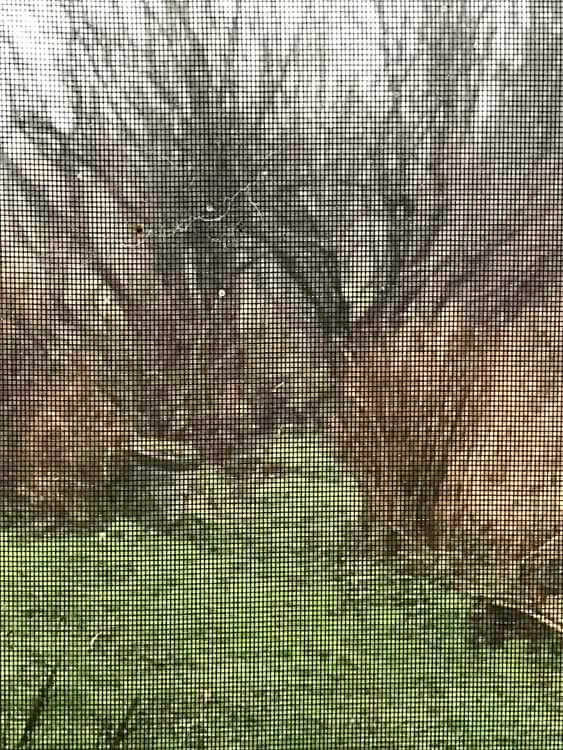
What can I add here? Not much to choose from if you’re going for “free.”
A blooming forsythia, although a bit early, would be cheerful.
A Chandler Wood Arbor creates a “focal point” to the willow cathedral, which truly needs no other entryway. With a little more room, I could have added a couple of chairs and a park bench.
A “Wonderful Pomegranate Tree” does indeed sound wonderful, if not a bit exotic – and the info says it will grow in Zone 8, although I find that doubtful.
Several blueberry shrubs – a little more realistic.
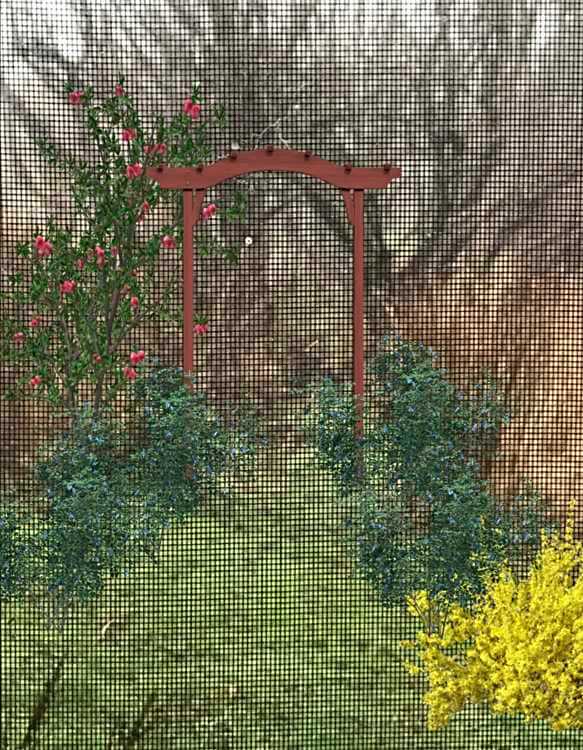
So – we went from something rather stark (but real) to something a bit ludicrous. Entertaining, perhaps – but sterile.
Back to the “Drawing Board”
The problems I see for me using these types of planners are
- I don’t grow things in rows (most vegetable garden planners are grid-based)
- I’m not convinced even the pro versions of landscape planners would have the plants I grow – Madder? Ulluco?
- I didn’t see an easy way of selecting plants and grouping them according to sun, water, and soil conditions – or of identifying microclimates on the property.
- Landscape planners assume you’re buying shrubs from some outlet, not starting things from seed, bulb, or cutting. No info when and how to start them; minimal growing info.
- Some planners are geared toward starting with a blank slate, not an established garden – although you could certainly modify it to reflect your current layout.
- Planners that will do everything you need them to do are probably out there. I’m just not willing to pay for them.
Every Garden, Every Year is Unique
The thing is, I don’t have a particular space in mind for a “dye garden,” any more than I have an herb garden, a moon garden, or even a specific place for growing vegetables. Everything is tucked in here and there depending on light, soil, and water conditions, spread out around two acres. As our perennial shrubs grow and mature, the available space and light for annuals changes. In fact, everything is always changing, as it should.
Hardly anything is in rows anymore. Garden beds have morphed into patches – that is, groupings of like-minded individuals that all have something important to contribute to the well-being of the whole.
Planning, for me, is more like figuring out where things “fit in.” And the more diversity, the better.
Making Do
So then I got to thinking – what do I already have? My first thought was – duh – paper and pencil. I like low-tech. I also prefer real books. However, things are known to get lost in stacks of papers.
But I am not a luddite. I actually like technology.
I ended up using the same four programs that I used in my Permaculture Design Course in 2014:
- Excel for the initial database
- XMind – an open-source (free) program for creating mind maps
- Internet / Google Maps for downloading an image of our property
- Inkscape, an open-source vector drawing program that allows you to create designs in layers.
A person wouldn’t need all these – and of course there are many others you could use — but each one had an advantage in terms of how to look at the information. Not as pretty as the designer models, but this is for my own use, not to present to a client.
Step 1: Make a List and Organize According to Light, Water, and Soil Requirements
Easy. I am Great at making lists. (Here is my full dye plant list.)
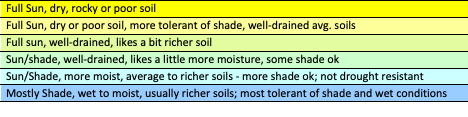
Excel is a wonderful tool. I have created a database of almost everything I grow or have grown in the past however many years. Columns include plant names, size, sun/shade light preference, soil pH, type of soil, water needs, propagation and growing requirements, and other factors. Nerdy, I know, but when I am looking for what might grow in a full sun, alkaline, rocky place, for example, a quick sort will give me some ideas. If I want to know which seeds require cold stratification, or which plants are deer resistant, or when they bloom, I can easily sort for that information, too. I color-code the rows (yellow-green-blue) according to sun and water preference and provide a column for pH (red for acidic, lavender for neutral, and blue for alkaline).
It’s a work in progress.
So – sort for dye plants; sort for sun-to-shade and dry-to-wet; sort again for pH.
Step 2: Mind-Mapping to Visualize Groupings
I then used XMind to create a series of mind maps, color-coding the groupings to match the Excel codes of yellow-green-blue for sun and water needs, with red-lavender-blue borders to indicate soil pH.
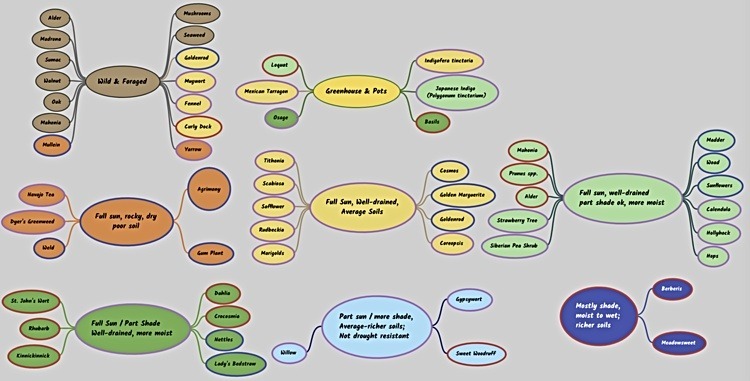
How easy, now, to pick a central focus species with similar growing preferences, and then group these clusters around it.
In retrospect – I could have skipped this step altogether. True, it allows you to see things grouped together, but you can also visualize that in Excel (especially with color-coded rows). XMind does not import into Inkscape, so when you start making the maps, you have to draw the little circles all over again. However, I also gained a few insights by diagramming it in this simplified way.
Patterns Begin to Emerge
Some observations:
- It’s easy to visualize companion plants that can be used to form a “guild.”
- A whole lot of things can be foraged without having to personally grow anything.
- In nature, things overlap. Plants might prefer a more alkaline soil but will also grow just fine in a more neutral environment – and visa versa.
- The Sunny category of plants are more likely to prefer poorer soil and dryer conditions. Most of them grow in alkaline-to-neutral soil pH and would, therefore, live in a more bacteria-dominated environment.
- The great majority of my annual seeds prefer full sun. Most of these are self-sowers.
- Many of the “full sun” perennials are even considered weeds.
- There are few acid-loving plants in the full sun categories (at least, not in my list of dye plants – grapes being an exception, which I do not use as a dye, per se, but for the tannin in their leaves).
- With increasing moisture and shade tolerance, plants move more toward an acidic, fungal-dominated soil.
- Most of the trees can handle part sun/part shade and like richer, more acidic soil and more water.
- There are no alkaline lovers in the shady, moist-to-wet area groups.
- Most important observation: I already have everything I need (but I will still be starting a few favorites).
Ok. We have a list of plants and have sorted them according to basic needs. Final task: Figure out how everything realistically fits together.
Step 3: Download Image from Google Maps; Import to Inkscape
Google Maps and Google Earth are great tools for mapping the layout of your property and the exact placement of buildings and other components, such as driveways and trees. I used a screenshot in planning the different phases of our permaculture design and also in looking at tracking the sun and shadows throughout the year. Simply import a screenshot into Inkscape (or other drawing program that supports importing images).
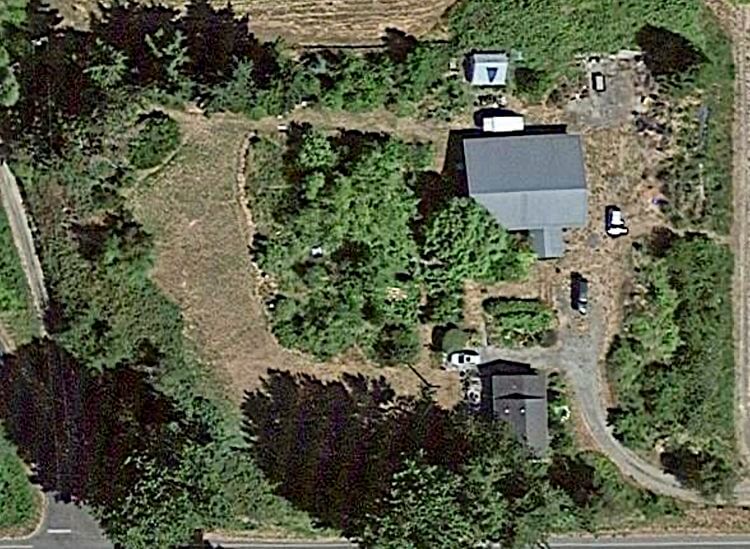
Of course, you can roughly measure stuff out yourself or just do a quick sketch. This works. It doesn’t have to be perfect. Or just walk around and think about it (my usual method). But we are trying to be more organized and deliberate here.
The whole point is to get a handle on where, exactly, you have room for 10 trays of 18 pots, with 5 or more plants in each pot, when everything is overcrowded and getting rootbound and screaming to be put into the ground. You will hear them in your sleep. Believe me.
Step 4: Use Inkscape to Create Layers of Information
The Property Layer:
So – After you import the image of your property into Inkscape or similar drawing program, create a layer on top of it, decrease the opacity so you can see the Google image below, and trace around the key features on the site: buildings, property lines, irrigation ditches, drain fields, driveways, major trees, ponds, etc. Then go ahead and delete (or hide) the original photo so it doesn’t look too cluttered. You now have a clean drawing of your property on its very own layer. Lock it.
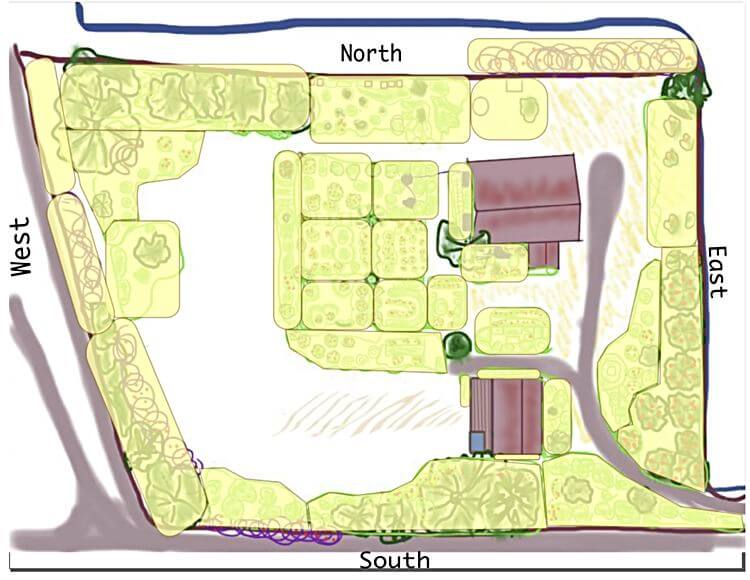
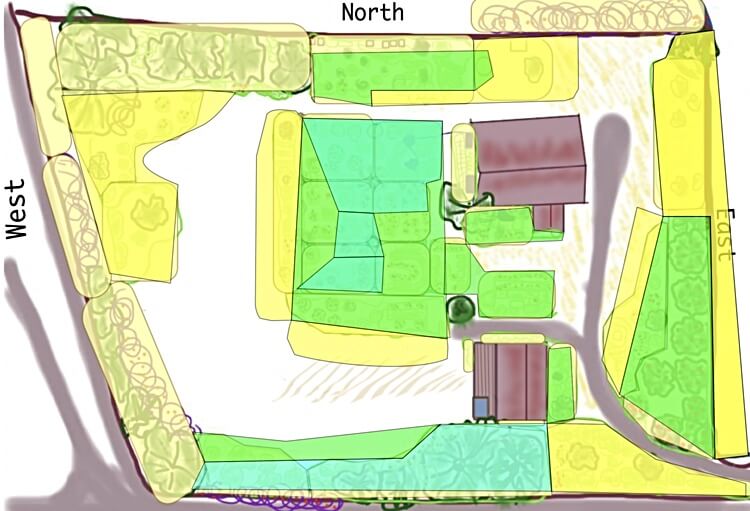
The “Conditions” Layer:
Create a new layer for coloring in your microclimates and areas according to sun/shade and dry/moist conditions. Because Inkscape is vector-based, draw geometric shapes or “freestyle” closed shapes and then fill them in (50% opacity allows you to see the layer beneath). I would have preferred a paintbrush tool – (Photoshop?). Again, it doesn’t have to be exact. When you place your plants on location in the next step, you will see immediately whether or not they belong there or whether you might want to make amendments.
The Plant Layers:
Creating layers for the different kinds of plants allows you to hide or view the information. The program is just a tool, so do whatever makes sense to you. For each layer, I created colored circles (yellow-green-blue) according to light and water preferences and borders (red, lavender, blue) to reflect the pH (as above).
Large Perennial Layer: I found it useful to see where the trees and shrubs are that I know I will not be moving. Of course, these aren’t ALL the trees on the property – just those that I might consider using for fixatives and dyes.
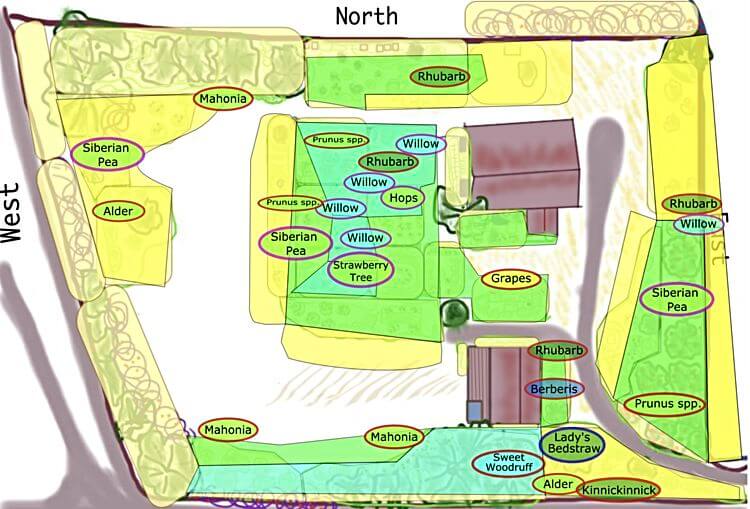
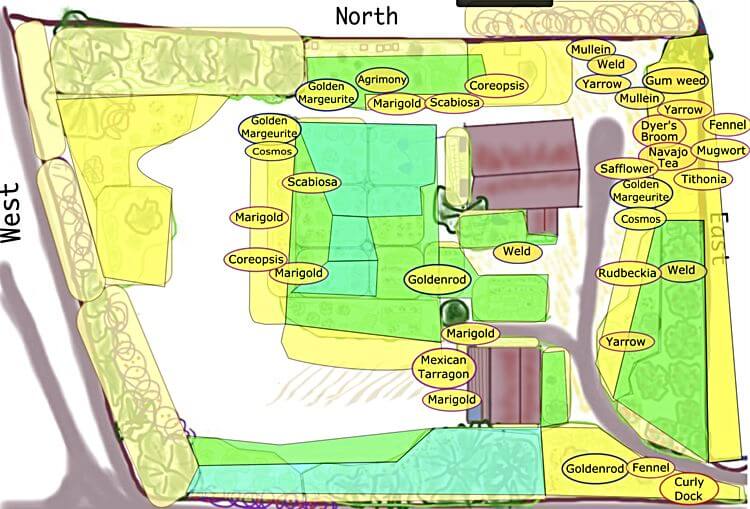
Next layer: the sunny plants (slightly darker yellow and light yellow, with dark yellow being the most drought-tolerant).
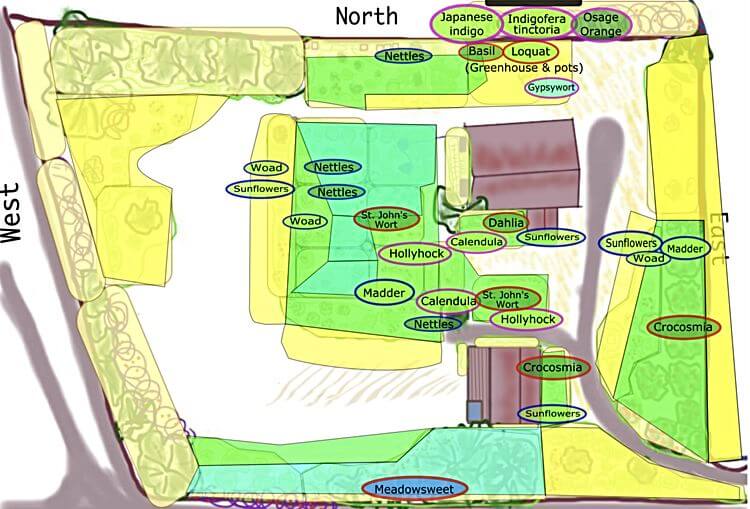
Next layer: the “green” plants that like part sun/part shade and a little more moisture. I didn’t have many in the “blue” category, i.e., those that prefer more shade, rich soil, and moist-to-wet conditions, so I added them to this layer.
Some Thoughts:
- Sun lovers will naturally grow along the outer edges.
- Plants that have a wide tolerance to pH levels can act as buffers between those that distinctly prefer alkaline or acidic soils.
- In placing plants, consider height and spread both above and below ground to complement one another, not force into competition.
- Pots give a lot of flexibility. Grow in pots those plants that can’t possibly survive grass and bindweed invasions and vole and deer browsing. Also those things that need to be moved inside for winter.
How the Map Can Help
- The map helps you see what works and what doesn’t. It also helps you see where there might be an empty space (recognizing this map was just about dye plants – not every “empty” spot is really empty).
- Relationships: The map will quickly highlight mis-matched plantings.
- What to move – what to stay: As the plants mature, they might outgrow their original space – or maybe they are now shaded by surrounding overgrowth and would prefer more sun. Be realistic about what you can and can’t move. My hops and willows, for example, will stay right where they’re at (Plant Layer 1 – Established Plants).
- Areas for Expansion: The map might give ideas for where to plant things that can later be divided (e.g., Black-Eyed Susans, Golden Marguerite) – or where to plant self-sowers so they have room to reseed (weld, coreopsis, hollyhocks). Plan for large groupings of the same plant, which are preferred by bees and other pollinators.
Still Deciding? Plant Selection – Narrowing the Focus
With all the dye plants out there, narrowing the list can be difficult. Here is my approach:
- Primary colors are worth the effort: madder, weld, woad – these are my top 3 for red, yellow, blue.
- Foraged plants: don’t plant what you can find: oak, walnut, alder, mahonia, sumac, mushrooms, and lichens, for example. Why am I growing gum weed? (Good question.) (Forage respectfully and sustainably, of course.)
- Which will do better in the greenhouse? (e.g., indigo, purple basils) Is there room?
- Yellow, yellow, and more yellow – lots of plants give yellows – how many do you really want?
- Harvest timing: Will they be ready to harvest at the same time as an orchard full of apples?
- Lightfast factor – I appreciate subtleties, to an extent…. Watching all your hard work fade into nothingness is kind of like watching your elaborate sand sculpture be washed out to sea. We learn to accept the fleeting flight of time… and yet… I think I will stick to those that last awhile longer.
- Additional functions: Consider keeping those that serve other purposes, such as food, cordage, pollinator favorites, etc. I will grow blueberries, but I won’t waste them on dyeing fabric.
The Overall View
Put it all together:
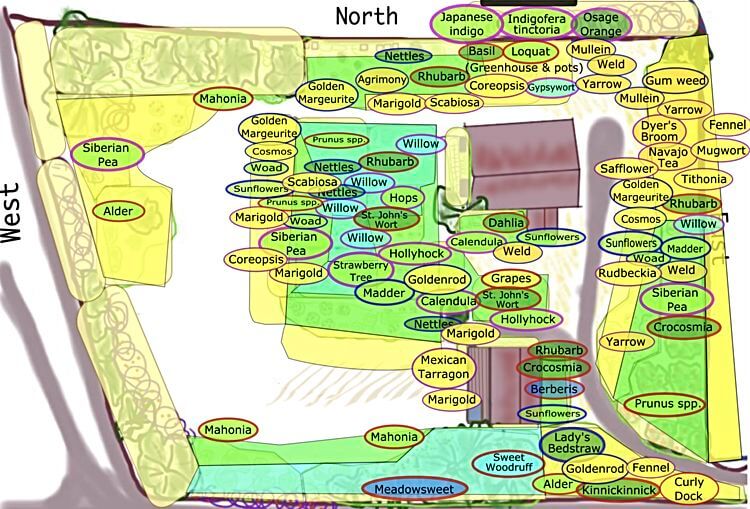
It looks pretty busy and is not truly representative of the actual garden, because a circle will be larger if the name of the plant is longer (e.g., St. John’s Wort vs Weld), not based on the size of the actual plant. You can still get a general idea of what can go where, which is the whole idea. And, of course, the basic mapping process could be applied to any kind of garden.
I figure the more I fill in the spaces with plants I actually want to grow, the less room there will be for “weeds.” That’s my strategy.
AND – when my leggy seedlings are crying out to stretch their roots, I will know exactly where to put them.
Excellent. I will re read. I agree working with fugitive dyes. Or least now I do entering my third year of natural dyeing. I am almost 80 so time is short and I want brilliant colors to leave behind.
thank you
Sandra Haynie
Hi Sandra – I agree! I just hit the 70 mark. It has given me a bit different perspective. Leaving brilliant colors behind sounds like a great goal! Perhaps I should have listed the plants under each of the different sun-water-soil conditions. Or perhaps that is for a different post. My posts tend to be so long already! But I hope to share more on my dyeing experiments in the future – as well as on growing the plants that inspire us. I, too, feel like such a beginner. Perhaps we always do. Best of luck to you, and thanks for reading and taking the time to comment. ~blythe