 It’s that time of year again! Time to plant your garlic!
You would think that after 30 years of growing garlic, I would have this down to a science. But I have to say, every year is a little different. After last year’s “learning experience” (ahm!), I am rethinking what I thought I knew and going back to some basics.
There is a lot of good advice out there on the Internet, but you have to examine it according to your own situation. You can read that statement twice if you want to.
Here is my basic process:
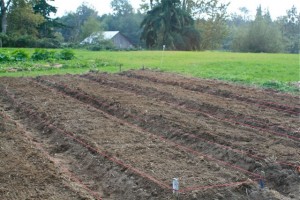
- Build beds by shoveling dirt from pathways into the middle of the bed and rake smooth
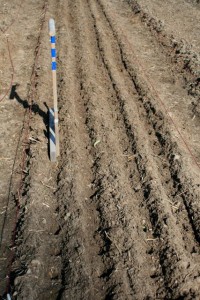
- Mark rows at least 6″ apart down the length of the bed
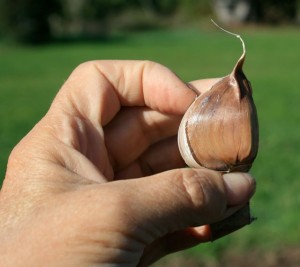
- Break apart bulbs and pick out the biggest, cleanest cloves for planting
- Stick individual cloves root-end down, pointy-end up, about 3-4″ down into the soil, 6-8″ apart down the row (more for elephant garlic)
- Cover with about 2″ of soil and pat down snug.
That’s it.
Need more details?

Crop Rotation:
Number One: Never plant your garlic in same place twice in a row. You have to rotate your garlic to prevent diseases, and preferably, over 3 to 4 years or even more. I have six 25-ft square plots around which I rotate my garlic from one year to the next. I’ve recently dedicated one plot to berries, and another I usually keep in veggies, so realistically, that makes 4 or 5, depending on where I put the vegetables.
Building the Soil:
Soil is everything. Garlic is a heavy feeder. The size of your bulbs and their nutritional value are directly related to the soil. Ideal pH is between 6.5 and 7.0.
I do a lot to build the soil, but I confess, I am never sure it is enough. We have a heavy layer of clay beneath about 6″ of topsoil, and it has been a very difficult soil to amend. I plant cover crops of rye, vetch, clover, and buckwheat, depending on the season and other variables. In the past, I have turned them under with a tiller, which I always worry will just create more hardpan and in the process, cut up every worm that might be trying to survive in there. This year, I planted very tall rye grass, cut it with a sickle and turned things over with a pitchfork, which was a lot gentler on the worms and various bugs and microbes, but a heck of a lot of work. I topped it with about 7 yards of well-composted cow manure (thank you Dungeness Valley Creamery!) and turned that over, too. Then I planted buckwheat and turned that in. I tell you what. I am beat. But the soil looks beautiful. It’s going to be the best garlic ever. And yes, I say that every year.
I would like to do the “no-till” layer method, but quite frankly, it hasn’t worked for me. Layers of mulch have only helped molds to grow and the weeds still loved them.
Planning:
| WITH 1-FT BORDER, HAVE ~22 FEET TO WORK WITH | bulbs across | length space | bulbs/bed | total bulbs | ||||
| 5 | beds | 3.5 | ft wide | 17.5 | 4 | 6 | 192 | 960 |
| 4 | paths | 1.5 | ft wide | 6 | 4 | 8 | 142 | 710 |
| 23.5 | ||||||||
| 5 | beds | 3 | ft wide | 15 | 4 | 6 | 192 | 960 |
| 4 | paths | 1.5 | ft wide | 6 | 4 | 8 | 142 | 710 |
| 21 | 3 | 6 | 144 | 720 | ||||
| 3 | 8 | 106.5 | 532.5 | |||||
| 6 | beds | 2.5 | ft wide | 15 | 3 | 6 | 144 | 864 |
| 5 | paths | 1.5 | ft wide | 7.5 | 2 | 8 | 71 | 426 |
| 22.5 | ||||||||
| 7 | beds | 2 | ft wide | 14 | 2 | 6 | 96 | 672 |
| 6 | paths | 1.5 | ft wide | 9 | 2 | 8 | 71 | 497 |
| 23 | ||||||||
What is this deal with math and gardening? I find myself calculating spacing and bed widths and varying crop yields in my sleep!
This year, I planned for five 3-ft wide beds, ~25-ft long, with 1.5-ft paths between. I am planting 4 rows of garlic down the beds spaced just under 8″ apart across the bed (which leaves 6″+ on the edges) and 6″ apart down the rows. It gives me about 200 plants per bed, actually, a little more, because the beds are a little longer than 25 feet. I considered variations of narrower beds, 3 rows across; fewer beds, wider spacing of cloves and wider spacing of paths; 2 rows of bulbs flat on the ground; etc. etc. etc. – but for my situation, the 5-bed scheme worked best. Because my plot is a little longer than wide, my plan is to run the beds lengthwise, running north-south. It’s a sunny spot, and I don’t worry too much about the rotation of the earth relative to direction.
Building Beds:
As mentioned above, building beds is simply shoveling dirt from the pathways into the center of the bed and raking it smooth.
In the past, I have built my beds quite high to help with drainage and to keep the soil softer and warmer. I have found, however, that the sides tend to slough off a bit. One year, I planted the cloves too near the edge. Those cloves seemed to get a head start with the warming sun in the spring; however, later, when the plants were taller, their roots were too close to the outside edge and were easily damaged and/or exposed.
Another problem was the weeds. Tall beds provide more surface area. Dandelions, in particular, took a real liking to the sidewalls of the taller beds, which were nice and warm in the early spring. Although at first I thought the weeds helped stabilize the bed, I later realized they were competing for water and nutrients (and winning). I sliced them off at ground level and tossed the leaves into the paths, but they just grew back all that much stronger. I later dug up phenomenal roots over an inch in diameter that extended toward China.
I am hoping that my beds this year are raised enough to stand out and remain soft, but low enough to facilitate weeding.
Other Soil Amendments:
It is easy to get carried away with various additives, many of which have “Meal” in the name, which obviously indicates something good for your plants: alfalfa meal, blood meal, bone meal, soybean meal, feather meal, etc. I’ve been known to add all of these things to the beds, although I usually save the blood meal for the spring because it provides a quicker release of nitrogen. Usually our soils benefit with the addition of a little lime to bring the pH up. I have in the past also added Greensand to add minerals and loosen clay, and something called Meadowfoam, which provides pesticidal qualities against nematodes, wireworms, bacteria, and fungus. I have mixed these into the soil with the precision of the flamboyant chef I tend to be and topped it all with compost, a sprinkle of kelp, and a dash of worm tea mixed with fragrant fish emulsion.
Well, guess what folks – this year I did that thing they always tell you to do: I took soil samples and used a test kit to measure the NPK & pH – and guess what – everything looked fine.
Hmm. Adding at the very least a little lime & bonemeal has been standard procedure for years, but if it ain’t broke….
Like I said – I am rethinking everything this year. Going back to basics means keeping it simple. I have already done my work with this soil – I have broken up clay clods as best I can – and this is hard for me – but at this point, I am not going to mess with it!
I will reevaluate the situation in the spring and go from there.
Planting:
Size: When it comes to garlic, size matters. Plant your biggest, best cloves. Period. And when those run out, plant everything else (you can never have too much garlic!). A bunch of little ones crammed together at the ends of the rows make good scallions in the spring.

Spacing: Give your main bulbs plenty of room. Disregard advice that tells you to plant them 4″ apart. Give them at least 6″ and more if you have it. Take a look sometime at the roots of the garlic plant. Some varieties grow long thick roots that extend quite a ways into the soil. I think these probably hold up best under repeated frost upheavals. Others are relatively shallow-rooted, but they still spread out. It you crowd the bulbs, you are also crowding the roots. The bulbs will be larger if the roots don’t have to compete for food and water – whether from weeds or neighboring plants.
This year, my planting philosophy is going to be all about breathing. Give them the space to breath. Allow the air to circulate. Get anything out of the way that interferes with breathing. If we all just focus on our breathing, we can eliminate a lot of stress. So it is with plants.
Pre-Plant Soak: In years past, I have soaked the cloves in diluted liquid seaweed with a little added baking soda and molasses. I have dunked them in rubbing alcohol just before planting. It makes sense to give them this boost for growth and added protection against fungi and molds.
I can’t claim credit for the soaking idea. It’s common knowledge to soak pea seeds – but recommendations for soaking garlic come from the Garlic-Growing Guru Bob Anderson over at Gourmet Garlic Gardens, where you will find a wealth of information about garlic. His online farmer’s market concept for selling garlic has helped small growers all over the country.

However, in line with my theme to rethink everything I thought I knew, and in the spirit of keeping it simple, I broke the rules again and I just stuck them in the ground. That’s right folks. No bowls of soaking liquid. I didn’t peel them (in fact, they look so naked and vulnerable without their peelings, a description that will probably reward me with all kinds of spam mail).
Maybe – just maybe – presoaking actually invites molds, bacteria, and nematodes in my neck of the woods. On the one hand, you want to get the garlic going before winter sets in, but you don’t want it going so strong that it gets spindly and is more susceptible to freeze damage. Maybe the peelings harbor molds and bacteria from the soil; but maybe they offer some protection as well. If the clove is bruised with all the handling (and it certainly is softer after all that soaking), it might be more vulnerable to problems. We need the plants to get a bit of a head start; we need them to go through their cold period to be able to form bulbs; but we also need to focus the main part of the growth in the spring – not now.
You have to do what’s right for your situation. This year, I skipped the presoak ritual. I just stuck them in the ground, pointy-end up, root-end down, covered it with about 2″ of soil and patted it down snug, probably just as people have done for over 2000 years. I’ll let you know how this works out.
The Mulch Mantra:
I can’t end this without talking about mulch. I am convinced that mulch was my demise this last year. We had a heck of a lot of rain, and although I think the mulch helped to filter all that water, it also kept all that water there longer and kept the soil cold. Plus, it seeded a lot of weeds in the beds, which loved that cool, wet soil. I have been debating on whether to put just a light covering of grass clippings over the beds, but I am resisting that temptation. People living in Wisconsin or Pennsylvania probably need that extra layer of insulation. People in the high desert of California undoubtedly use a lot of mulch to conserve water. But out here on the Olympic Peninsula – maybe it’s not a good idea. We need drainage. We need to warm up and dry out occasionally. Yes, it will freeze and thaw and freeze again enough to make all the roadways glare ice, but that’s nothin’ compared with the ice storms in New York. Yes, we are predicted to get record snowfalls this year – and frankly, some snow protection will be appreciated, even if it shuts down the town because we have no way of removing it – but records here are nothin’ compared to the drifts across the Dakotas. So – based on this year’s disaster – I am ignoring all advice on the necessity of mulching. For us, mulch is just an open invitation to molds, fungi, and critters. Maybe if we get some summer heat and a long drought, I will reconsider – but for now, the winter protection for the garlic consists of the soil on top. That’s it.
Time to Kick Back:
So that wasn’t so hard, was it? I have nearly 1000 cloves in the ground and a little experiment started with a bunch of little bulblets. I’m praying for a good crop and lots of garlic to share next summer.
Hope some of you find my tactics (and experience) useful. Take what you need and apply it to your own situation. Every year is different. Every season – every soil – every garlic variety. Garlic is a hardy plant, and I have proven that it will take a lot of abuse. But if you want really good garlic with plump firm cloves that burst with fire in your mouth and that keep you supplied until the greens are available in the spring, you have to think like a garlic. After 30-some years, I’m still figuring that one out.
(oh – and about the “kicking back” – I’m just being funny. Get busy and plant your winter cover crops!)
is it proper or feasable to grow garlic in same part of garden two years in a row
Hi Roy –
I just answered a similar question (which happened to be entered on the Fan Club sign-up page. Go to http://barbolian.com/thank-you/). This person had been growing a LOT of garlic in the same place for 6 years! So yes, it is entirely feasible. Proper? Hmmm. It is not advised. Everything you read says it’s really important to rotate your crops to prevent disease and pest infestations.
Personally, I have always rotated my crops and have repeated that mantra. That said, some people scatter their garlic here, there, and everywhere – not growing it in just one spot. It is a practice I am beginning to do more and more often because I have simply run out of room. When you aren’t growing garlic as a monocrop, I don’t think there is as much risk of a disease or pest outbreak – or if there is, it doesn’t take out your whole crop.
As I told the previous author, if you have heard of Paul Gautschi of Back to Eden fame – on a tour to his farm a few years ago, he explained that God doesn’t rotate crops, so why should we? Paul concentrates instead on mulching and building the soil. When it comes time to harvest, he reaches in, takes what he needs, and then puts some back. Same with potatoes. Build your soil, and your plants will be healthy, strong, and resist disease.
I think you can safely get away with growing the garlic in the same place for a couple of years. Beyond that, I think you need to assess your personal situation. Hope that helps – thanks for writing in – and best of luck to you!
gosh i just read in adtion to garlic we share harmonica passion…whilst Mayor I got to play & jam with many well known artists who would comply when in our area..haha
our friends are big bee keepers in our area and like our garlic Peace river honey world renowned…
yt
lgmann qc
Ha ha! This is great! My plants and bees appear to enjoy my harp playing — they understand good vibes! 😉
Wonderful read and information …esp. for we garlic grown’ newbies….way up here on the 56th meridian..Peace River Ab Canada. We are into our 2nd year..big incremental increase in plantings after a huge success on a4 foot X 25 foot first step…Our friends have jumped in as well…so wide varieties and over 1500 segments in the raised bed, on our fenced garden on our 1/2 section of land that won the Canadian wildlife Foundation national award for best land reclamation ..turning a former paint ball mess into a pristine park along the banks and hills of Peace River,
Our main partner is of dutch descent canadian…and did a minor commercial effort couple of years back..Gert’s Gourmet Garlic…he set up at farmers markets.
My bride and I are long time avid gardeners here in our compact season of nearly 24 hour daylight in our too short summers
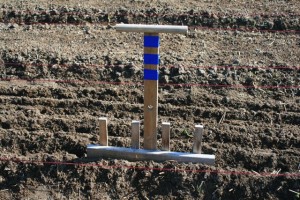
..I was interested in your “hockey stick”planting device….Gerry(gert) a carpenter by trade created a 1/2 sheet of plywood with space holes…with a “dibble”..we think he made that up..but is like a surveyors plumb bob…sooo you
drive the dibble in ,drop in the segment to all 36 holes then flip the board over and along…repeat …wonderful method
and one person puts on the cover
Your comments regarding cover, was of interest…as we did a clean straw(~ 8″ stalk…weed free we hope as temperatures can get to -30 here in winter…but summer spectacular..the method worked in our last year small bed
…but it was not the cleanest cover and weeds were an issue
NOW the garlic…a study in neighbouring province to west of Alberta did a study on northern grown garlic, and other
hippy dippy things as ecencha,etc….and it showed the levels of the active ingredients in garlic in this area the highest around….one bite vs grocery store stock is instant confirmation…takes your breath away and stops our dread colds with one portion chopped up and on toast…
we hope the straw in fact clean and does not become a winter hiding spot for smaller vermin able to get through fence
…any roads…thanks for your great site. and sharing…
later..from fellow garlic growers and snappers in Peace River Alberta Canada…
What a wonderful note! It is so fun to hear about what other people are doing! Being recognized by the Wildlife Foundation for outstanding land reclamation is FANTASTIC! Thank you! Our planet needs more people like you! I looked up Peace River, Alberta on the map – such a beautiful area & a place of many extremes! I used to live in Alaska, so I fully understand those long days of summer and short, cold days of winter. I was surprised, though, that you don’t get more rain — you are about the same as we are (15″/386 mm), with most of your rain (like ours) hitting the mountains before it reaches you — but, of course, you get way more snow. Some years, we don’t get any at all. We have a constant freezing & thawing over the winter, which causes its own problems.
My theory is that the more extreme the environment & the harsher the conditions, the more powerful the medicine! And hey, they grow garlic in Siberia, right? Definitely no comparison between store-bought and hardnecks grown on your own nurtured soil!
I like your description of the garlic-planting tool to get all your holes spaced evenly across the bed!
These days, I am mulching everything in my garden with as much mulch as I can get — with a few mixed results. Yes, it most definitely builds the soil and conserves water, which are my biggest reasons for doing so. Yes, little voles create a lot of damage on all but the most established plants. If the roots can get below the traffic zone, the plant seems to recover ok. Carrots have been a loss every year, but I keep trying. My latest strategy is to just plant way more than I need and that way, there is plenty for everyone. The mulch has not yet been the weed suppressant I had hoped, although the weeds are easier to pull. Grass, thistles, morning glory/bindweed – these plants are tenacious and grow through everything. My mulch has a lot of seeds in it, too – even the straw – so I think what I really need are ducks & geese. We are hoping to get some this next year.
I have to say, I am not growing as much garlic as I used to. My garden space has transformed more into a permaculture environment with lots of different kinds of herbs, bee plants, veggies, and fruits, nuts, & berries throughout. It is my little effort to save bees and help turn back climate change. Cutting back on the garlic was a difficult decision to make; I was at one time growing 27 varieties and about 1500 bulbs, which is a lot for one person, and as you know, it takes time to build up to that kind of seed stock. As I filled up the area with perennials, though, I found it harder & harder to find a sunny plot in which to rotate the garlic. Still, I will always tuck a few garlic bulbs in here and there throughout. How could I not?
Thank you for contacting me! It’s great to have friends in Alberta! Best of luck to you in the coming season! Keep me posted!
~Blythe
Hi Greg! Thanks for stopping back in! How many are you planting this year? Varieties?
I had not heard about the sale of the Hood River Garlic farm – they have a great website & it looks like a huge operation! Lots of work indeed!
I did, however, notice that the Lonesome Whistle Farm out of Eugene had similar problems to mine … lots of rain & extended cool weather took their toll on their crop – sad results I understand too well! They, too, have what looks like a pretty good-sized farm – and the diversity of crops helped pull them through.
Keep me posted on your garlic – and keep in touch!
Blythe
Hi Blythe,
Nice write up again. We are also looking at planting more garlic this year too. Our beds are almost ready, so by next weekend we will have them done and planted! Oh and did you hear? hoodrivergarlic is for sale (entire business). not sure why but we both know growing great garlic take time and lots of work. Good luck with your crop!