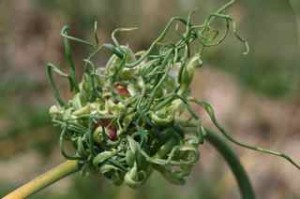
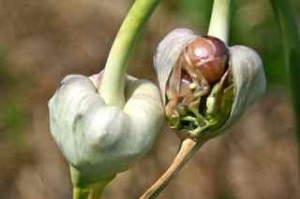
The weather can get seriously nasty in November, but if you have a few garlic cloves left, you can still stick them in the ground.
 I laugh as I read that sentence, which I wrote after I got the main garlic crop in the ground and also – and this is key – an experimental crop of bulbils, those tiny seed-like things in the mature scapes. I then “blithely” skipped town and headed for a week in a warmer climate. In my absence, the Olympic Peninsula got hammered with about a foot of heavy snow – which I have not yet come home to witness. In fact, I’m not sure I can even make it home – and based on reports, I’m not sure I even want to!
But seriously, folks – saving those scapes and planting the little bulbils just may have saved my you-know-what. (CROP is what I mean, of course.)
Yeah, I know – most people don’t allow the scapes to mature. Common wisdom says to cut off the scape in June when it snakes its gangly neck toward the sun, which forces the plant to send its full energy downward, resulting in gargantuan (one would hope!) bulbs.
Traditionally, I, too, being the manipulative person I am, have followed this advice. But I just had this gut feeling last May that everything was not going as well below ground as it was above. We had more rain October through December than we usually get all year, and where we usually get an average of 17” per year, by the end April, we were approaching 2 feet. All winter and spring, steady winds roared in off the coast, gusts frequently topping 40 mph. Our average maximum temperature, even during the “heat” of summer, never hit 70 degrees. I had placed a relatively heavy mulch of old hay over the crop, which I thought was helping to filter the rain and protect the plants, but I knew it could go both ways – it might just be holding in the cold and wet.
Hmmmm.
 And so, when it came time to cut the scapes, I thought maybe I should let the plant do its own thing – be the plant it was designed to be. I confess, I cut a few simply because they are so irresistibly good, but I showed remarkable self-restraint and let the rest grow. If all else fails, I reasoned, I can at least start over with the scapes.
It proved to be a good tactic, as I lost nearly 75% of my bulbs to mold and neck rot.
The best hardneck survivors of rain, wind, and outright neglect:
- Porcelain: German Extra Hardy and Romanian Red
- Purple Stripe: Russian Giant and Siberian
(Lesson learned: I should have pulled back the mulch much earlier than I did – or not used it at all.)
Ok. Moving forward.
How do you plant bulbils from scapes?
Heck if I know. You think I’m some kind of expert just because I blog about it? Beware of people like me on the Blogosphere! I’ve never done it before. But I know it can be done. Or so I hear. Course, you have to pay attention to your plants for at least 3 years to get them up to size (again, according to Internet wisdom) – but if you consider how many little bulbils you can get off one scape, and how much it costs if you buy disease-free organic seed stock at somewhere between $14 and $20/lb or more, it would seem to be an excellent way to size up your crop if that’s the way you want to go. And as a caveat – I HAVE successfully planted the little nuggets that grow off the sides of Elephant garlic bulbs – but that’s not the same thing. Besides, Elephant garlic is not really a garlic, but a leek.
So here is what I did:
Where to put them was a major consideration. I knew I couldn’t plant the tiny bulbils in my regular garden because they would probably look like blades of grass and would be difficult to weed out. I needed someplace relatively protected, because they are likely to be fragile this first year. Planting them inside was not an option for me, and besides, they probably need a period of cold like their larger cousins.

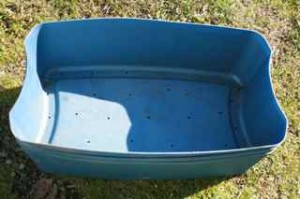
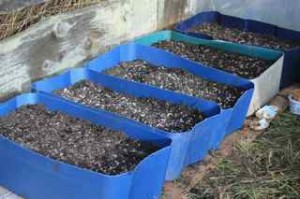
 Next problem: What to plant them in. I did not have enough pots for the number of bulbils I wanted to plant, but I did happen to have some large plastic bins that I had previously used for my red wiggler worms. I cut them in half around the perimeter (a 2-foot depth of soil seemed like overkill, and I could use the top rims to use as border control around invasive plants). I drilled holes in the bottom for drainage and filled the bins with decent potting soil that was reasonably weed-free. The bulbil seeds vary from the size of a spinach seed to a large pea – so I pressed them into the soil accordingly and covered them with more top soil. I covered the bins with a scrap of fence wire mesh to keep the cat out – and we shall see.
I’ll keep you posted on the progress. Stay tuned!
I’ve been growing the Red Russian for a couple of years now and enjoy all the discussion.
Dealt BC Can is a great place to grow but.. fall planting has to be deep or crops are up very early. I’m expecting to plant seedlets 4-6″ deep in nov/2017. Bye for now.
Now this is interesting… You plant seedlets 4-6 inches deep in November?? It must help your delicate seedlings get through your winters better. Hmmm, I am thinking maybe I should experiment with deeper planting here, too, and perhaps start them a bit later than I usually do. Thanks for the tips, Pete! It is always fun to hear about how others grow their garlic, and especially when starting from bulbils.
If you’re talking about those highly water resistant bulbils that grow on the outside of the globes, peal both shells off them and plant them in autumn/fall. They’ll all come up!!!
I think you are referring to the little nuggets on the Elephant garlic (which is actually a kind of leek). The post refers to the ones that grow at the tip of the shoots on hardneck varieties. But you are absolutely right! Those little nuts on the outside of elephant garlic bulbs will form new plants. I once planted a bunch of them, only I didn’t peel them – I just put them in the ground. Well, nothing happened, and I later forgot about it. The spot was not in the main garden, and I basically neglected it. Three years later – guess what – elephant garlic sprouting up amongst the weeds & grasses in the harshest conditions! I had since quit growing the elephants and was so glad to have it back again! Good advice to peel them before planting. Much better (and quicker) results. Thanks for commenting!
Thank you! I can’t wait to try it!
Hi,
Did you grow on the Elephant ‘garlic’ bulbils you mentioned the same way ,as I have a large number from a Elephant garlic crop, which I
would like to use. Or did you do anything different to the method you’ve described?
Hi Jeff – I basically used the same method – planting relatively shallowly in a protected place so I could keep an eye on them. I planted both the little seedlets on the scape (yes! this works!) and ALSO those hard, nut-like corms that grow on the sides of the bulbs (also good!). The corms are a little trickier. You can soak them overnight (or longer), nick the hard shell, or rub the corm on sandpaper to help them germinate more easily. Soaking, nicking, & then soaking some more is good. One year, I put a bunch in the ground without doing anything (about 1″ down or so, as I remember, since they are fairly large) – and nothing happened. Ok, no great loss, I thought – I have more. And then THREE YEARS LATER, much to my surprise, some came up! So Mother Nature will eventually soften that shell for you, but without a little help, it takes more time (depending on your soil & water conditions, of course! I think these were in a relatively dry place.) Good luck!
~Blythe
Also, I’ve been able to save some of my varieties that I thought I had lost through planting the little bulbils. So that has been good, too. The tubs at least helped me to keep better track of them.
So.. how did the bulbils planting work out? From all that I have been reading, it seems that it takes two years to get a good crop if planting bulbs or three years if doing the bulbils. Is this the case in your experience?
Thanks
Marshall
Not necessarily – the bulbils vary a LOT in size, from the size of a grain of rice on up. The tiniest ones take at least 2 years – and sometimes 3. But my Juan de Fuca Wonder bulbils produced 2″ bulbs the very first year! Granted, that’s still small compared with the larger clove-planted bulbs, but I was pretty amazed at how well they did!
The challenge for me has been in keeping track of the little bulbils (that look like blades of grass). There was a bunch that I forgot about completely – wrote them off for dead & gone – and then lo & behold, they came back the following spring! The ground made a good storage spot, and I suppose that is what they would naturally do if left to their own devices without our “assistance”!